Audio Transcription — Setup & Registration Guide
You only need to register and connect once per computer. After that, transcribing audio is a matter of opening a file and clicking Transcribe.
What you’ll need
- TitleVision Sub Machine installed on your computer
- An internet connection
- An email address you can check (used to confirm your account)
- A payment card (transcription is paid for from prepaid credit)
Overview
There are three steps:
- Create your account — done in your web browser, started from inside Sub Machine.
- Add a payment method and credit — so jobs can be billed.
- Transcribe audio — choose a file, pick the spoken language, and run it.
The app and the website talk to each other automatically, so in most cases your account key isdelivered back to Sub Machine without any copy-and-paste.
Step 1 — Create your account
The easiest way to register is to let Sub Machine start the process for you. It opens the sign-up page in your browser and then connects itself automatically when you’re done.
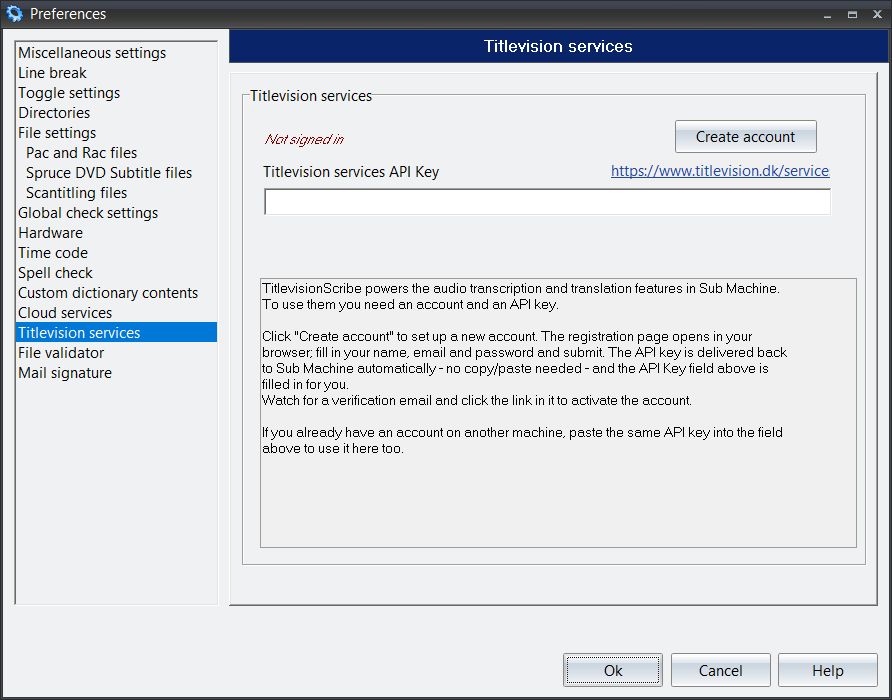
- In Sub Machine, open Preferences.
- In the list of pages on the left, select Titlevision services.
- Next to the status line (which will read Not signed in), click Create.
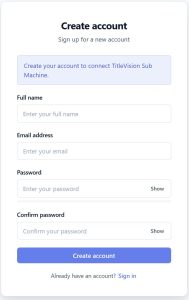
- Your web browser opens on the Titlevision sign-up page, showing the message “Create your account to connect TitleVision Sub Machine.”
- Fill in the form:
- Full name
- Email address
- Password (at least 8 characters — the strength meter will guide you)
- Confirm password
- Click Create account.
You’ll see a confirmation that your account was created and that a verification email has been sent.
Leave the Preferences window open. While you finish in the browser, Sub Machine shows “Waiting for sign-up to complete in your browser…” and is listening for your account to be ready.

Confirm your email
- Open your inbox and look for the verification email from Titlevision.
- Click the verification link inside it.
- The link returns you to the sign-in page with an “Email verified” banner.
Depending on how the service is configured, Sub Machine will connect either as soon as the account is created or right after you click the verification link. When it connects, you’ll see a message: “Your new account is connected. You can now use audio transcription and translation.”
The Titlevision services page in Preferences will now show Signed in in green, and the API key field will be filled in. You’re connected.
Step 2 — Add a payment method and credit
Transcription and translation are paid for out of prepaid credit on your account (charged in euro). You add a payment card once, then top up credit whenever you need it.
Add a payment card (first sign-in)
The first time you sign in on the website at titlevision.dk/services, you’ll be taken to a secure payment-setup page to register a card. This card is used to settle usage; you are not charged simply for adding it.
Add credit
- Sign in on the website and go to Add credits.
- Enter the amount you want to add and complete the secure checkout.
- Your credit balance updates as soon as the payment is confirmed.
You can see your current credit, usage, and past invoices any time from your Customer Overview and Invoices pages on the website.
How usage is counted
- Audio transcription is billed by length of audio (1 unit = 1 hour at 10 euros).
- Translation (if you use it) is billed by amount of text (1 unit = 1000 words at 1 euro).
Before a transcription starts, Sub Machine checks that you have enough credit. If you don’t, it will open the top-up page in your browser automatically — add credit and run the job again.
Step 3 — Transcribe audio
- From the main TitleVision window, open the Audio Transcribe using Titlevision Services window.
- If your account isn’t connected yet, you’ll see a prompt titled “TitlevisionScribe account required.” Click Yes to open the Titlevision services settings page, then follow Step 1 to connect.
- Next to Video clip, click Open file and choose the video or audio file you want to transcribe.
- Set the Start timecode if your subtitles should begin at a specific time. The default is 00:00:00:00.
- Choose the Video language — the language actually spoken in the audio.
- You must select a language here; it makes the transcription more accurate.
- Tick English language as a shortcut to set it to English.
- (Optional) Choose a Translated language if you want the transcript translated as well. Leave it on No translation to skip translation.
- Set the options as you prefer:
- Check Minimum Interval — adjusts the gaps between subtitles to respect your minimum-interval setting.
- Delete temporary files — removes the working audio files when finished (on by default).
- Click Transcribe.
While it runs, the window shows the current operation (encoding, uploading, transcribing, and translating if selected) and a progress bar. When it finishes, the result is saved as an .srt file next to your source file and brought into the editor as subtitles.
Checking your connection later
To confirm (or refresh) your connection at any time:
- Open Preferences → Titlevision services.
- The status line shows Signed in (green) when an account key is present.
If it shows Not signed in, click Create to register or reconnect.
Troubleshooting
“TitlevisionScribe account required” appears when I click Transcribe Your account isn’t connected. Click Yes to open the Titlevision services settings page and connect (see Step 1).
The status still says “Not signed in” after signing up Open Preferences → Titlevision services and click Create to try again.
“Sign-up timed out” / “Sign-up expired” The app stopped waiting for the browser. Click Create again to restart. If you already finished creating your account, you can instead copy your API key from your Customer Overview page on the website and paste it into the Titlevision services API key field in Preferences.
The verification link doesn’t work or has expired Verification links are time-limited. If yours expired, simply sign up again to get a new email.
“Need to select a language to translate from” Choose a Video language in the Audio Transcribe window before clicking Transcribe.
A job won’t start and the top-up page opened in my browser You don’t have enough credit for that job. Add credit on the Add credits page, then run the transcription again.
A network/HTTP error mentioning code 10054 This usually happens on a VPN connection. Disconnect the VPN and try again.
Can’t reach the server Check your internet connection and try again. If the problem persists, contact Titlevision support.
Quick reference
Task | Where |
Register / connect the app | Sub Machine → Preferences → Titlevision services → Create |
Check connection status | Preferences → Titlevision services (Signed in / Not signed in) |
Add a payment card | Website (titlevision.dk/services) — shown on first sign-in |
Add credit | Website → Add credits |
View credit, usage & invoices | Website → Customer Overview / Invoices |
Transcribe audio | Audio Transcribe using Titlevision Services window → Transcribe |